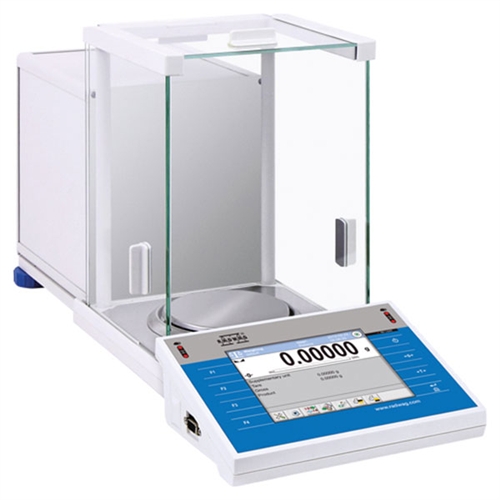
The AS 3Y Series Analytical Balance features a 5.7′ color touch screen display – a modern interface for balance operation and measurement presentation. It enables highly developed customization along with user profiles.
The AS 3Y Series includes an internal adjustment system using an internal mass standard. Its level is monitored by Level SENSING system, a RADWAG patented solution including an electronic level. A new feature of the 3Y series includes on-line monitoring of ambient conditions using either internal sensors or the external THB 3 Series module.
The AS 3Y Series features a large weighing chamber protected by an anti-draft shield from ambient conditions. The draft-shield also ensures cleanness and sterility of the weighing chamber interior.
The interactive mode of the AS 3Y Series guarantees speed and reliability for formulations based on data acquired from balance databases. The differential weighing mode facilitates incremental counting processes. Extended databases enable a user to keep records of all acquired measurements, additionally, data export and printing are available. Due to standard and custom printout formats, a user can design and document practically any process in accordance with GLP/GMP requirements. The balance features an independent mass control mode carried out in cooperation with an automatic feeder (PA-02/H Series).
Features and Benefits
- Electronic Level Indicatior:
- Functions:
- Alarm Function
- Graphic Level Indicator
- Programmable Acceptable Tilts
- Functions:
- Data Exchange Through USB Storage Devices
- Update Balance Software
- Export Weighing Data
- Export/Import Databases
- Export/Import Balance Settings
- Exchange Data Between Balances
- Infrared Proximity Sensors
- Optional Functions:
- Print function
- Tare function
- Sensor’s sensitivity adjustment
- Optional Functions:
- Communication Interfaces
- Ethernet
- 2xRS 232
- 2xUSB
- Additional Display Port
- Portability
- Extra Option: Balances with a wireless terminal
Functions
- Autotest: Diagnostic function aiming at metrological parameters determination (repeatability), the parameters are determined for the actual conditions of use. When speaking of repeatability it may be also used for weighing time optimization. Autotest is operated in an automatic mode thus operator’s time is saved.
- Checkweighing: Checkweighing function is used for checking whether the measured sample mass is within the predefined threshold values, Low [LO] and Hgh [HI]. The thresholds are given in [g] and [kg] units. Current state of a sample being measured is signaled by means of pictorgams located on a display for laboratory balances, for industrial scales Stacklight System is used. This visual +/- inspection is in operation during segregation, control or packing process of products for which mass has bees determined with a specified tolerance, eg. 12860 g 961
- Dosing: Weighing process for which reference mass has been determined together with tolerance for its determination. Dosing tolerance is given in [%] and it is calculated in relation to the reference value thus being a permissible deviation of this process. This solution is used for weighing powders, liquids and loose materials. Dosing function performance is often supported with bar graph – load indicator. For industrial scales it is possible to use a control systems of dosing process.
- Parts Counting: Function using mass measurement for determination of measured items quantity. Mass of a single item is required for this process. It may be either estimated through weightment or taken from a database. For items counting the following algorithm is used: all items mass / single item mass = quantity. Function operation is supported by a mechanism of Automatic Correction of Accuracy. This allows to update single item mass in course of the process. To a certain extend Automatic Correction of Accuracy eliminates error which may be a result of different mass values of seemingly alike single elements. For industry solutions items counting may be simultaneously carried out with checkweighing and dosing thus industry solutions feature audio signalling base informing that specified number of items has been weighed. It is possible to apply weighing systems using few platforms of different MAX capacities and different accuracies.
- Percent Setup: Percent setup function is used for comparison of measured products with mass standard. Mass of a mass standard may be a numeric value taken from a database or it may be determined through a measurement process. Each measured product is compared to mass standard, mass of which is presumed as a model 100% ideal mass. For products weighing less than the mass standard, obtained results are lower than 100%, for products weighing more, the obtained results are greatly excessed.
- GLP Procedures: Diagnostic function allowing to objectively document performed measurements. GLP procedures may be either presented in a short report form or extended one.
- Formulation: Function supporting the mixture making process, wherein the mixture contains various components. Formulation function usually uses the balance/scale database of components. Formulation serves for monitored checkweighing of every single component with a given tolerance. It is enriched with a set of individual settings.
- IR Sensors: Programmable function supporting the weighing process through control of the following options: sliding weighing chamber doors, printout, zeroing, tarring etc. Especially appreciated wherever preventing the balance from soiling is important.
- Statistics: Statistics function registers and analyses performed measurements. This supplies the user with the following information: Max and Min standard deviation, average value, variance, range et.
- Animal Weighing: Process of mass determination for a product which may unwillingly reposition within the weighing pan. Mass determination in such cases requires much longer period of time when compared to typical weighing process. It is the user who defines period of time needed for control of measured product mass. The user can thus optimize the function depending on the measured product characteristics.
- Density Determination: Liquid or solid body density function uses the Archimedes principle and it requires a special kit to be applied. The kit when used, replaces a weighing pan. For solids mass of the sample must be determined first in the air, next in the liquid of specified density. For liquids the so called sinker, density of which has been determined, must be measured first in the air, next in the tested liquid. The density determination process is disturbed by air bubbles which may stick either to the measured sample or the sinker. In case of laboratory equipment very light solids may be measured. For industry, solid bodies density may be determined by means of under-pan weighing. Tested load of significant size may be measured this way.
Technical Specifications
- Max capacity [Max] 510 g
- Minimum load 10 mg
- Readability [d]0.1 mg
- Tare range -510 g
- Repeatability 0.1 mg
- Linearity ±0.4 mg
- Stabilization time 3.5 s
- Sensitivity drift 1ppm/°C in temperature +15 – +35 °C
- Power supply 12 ч 16 V DC / 2.1 A
- Adjustment/Calibrationinternal (automatic)
- Interface 2ЧUSB, RS 232, Ethernet, 4Inputs/4Outputs
- Net weight/Gross weight6.2/10.2 kg
- Pan Sizeш 100 mm
- Packaging size 585 x 355 x 530 mm
Warranty Information
- 2-Year Warranty
Documentation:
- User Manual
- SQC in Laboratory


