Old Product Code: AS-82-220.R2 New Product Code: WL-104-1018
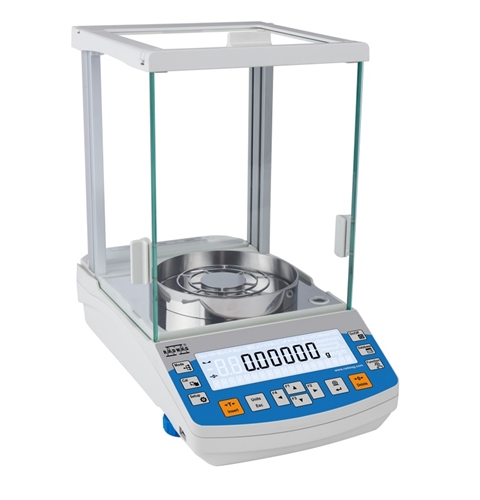
The AS R Series represents a new standard for analytical balances. They feature a modern quality LCD display with a clear presentation of weighing results. In addition, the display has a new text information line providing additional messages and data, e.g. product name or tare value.
The new R series product line also features pictograms that signal the activated working mode, connection with the Internet, the battery charge level, and balance service functions. The selection of displayed measuring units has also been increased. Every R series balance features a magneto-electric measuring system (with an internal adjustment option for the R2 balances) along with several communication interfaces: 2 x RS 232, Type A USB, Type B USB and included WiFi. The housing is made of plastic, and the pan is made of stainless steel.
In new AS R series balance the information system is based on 5 databases, which allows several users to work with several product databases, and the registered weighing results can be subject to further analysis.
Features and Benefits
- Interfaces
- 2xRS 232
- USB-A
- USB-B
- WiFi (Included)
- Extra Function Keys
- The balance comprises 2 buttons enabling easy access to DataBase and Functions. Additionally it is equipped with 4 programmable function keys F1-F4. The function keys can perform different operations for each mode:
- Header Printout
- Tare Editing
- Footer Printout
- Product Selection
- The balance comprises 2 buttons enabling easy access to DataBase and Functions. Additionally it is equipped with 4 programmable function keys F1-F4. The function keys can perform different operations for each mode:
- Additional Information Line
- Display has a new text information line allowing to show additional messages and data. E.g. Product name, operator name or tare value, etc.
- Grill Pan
- Complementary open work weighing pan
Functions
- Autotest: Diagnostic function aiming at metrological parameters determination (repeatability), the parameters are determined for the actual conditions of use. When speaking of repeatability it may be also used for weighing time optimization. Autotest is operated in an automatic mode thus operator’s time is saved.
- Checkweighing: Checkweighing function is used for checking whether the measured sample mass is within the predefined threshold values, Low [LO] and Hgh [HI]. The thresholds are given in [g] and [kg] units. Current state of a sample being measured is signaled by means of pictorgams located on a display for laboratory balances, for industrial scales Stacklight System is used. This visual +/- inspection is in operation during segregation, control or packing process of products for which mass has bees determined with a specified tolerance, eg. 12860 g 961
- Dosing: Weighing process for which reference mass has been determined together with tolerance for its determination. Dosing tolerance is given in [%] and it is calculated in relation to the reference value thus being a permissible deviation of this process. This solution is used for weighing powders, liquids and loose materials. Dosing function performance is often supported with bar graph – load indicator. For industrial scales it is possible to use a control systems of dosing process.
- Parts Counting: Function using mass measurement for determination of measured items quantity. Mass of a single item is required for this process. It may be either estimated through weightment or taken from a database. For items counting the following algorithm is used: all items mass / single item mass = quantity. Function operation is supported by a mechanism of Automatic Correction of Accuracy. This allows to update single item mass in course of the process. To a certain extend Automatic Correction of Accuracy eliminates error which may be a result of different mass values of seemingly alike single elements. For industry solutions items counting may be simultaneously carried out with checkweighing and dosing thus industry solutions feature audio signalling base informing that specified number of items has been weighed. It is possible to apply weighing systems using few platforms of different MAX capacities and different accuracies.
- Percent Setup: Percent setup function is used for comparison of measured products with mass standard. Mass of a mass standard may be a numeric value taken from a database or it may be determined through a measurement process. Each measured product is compared to mass standard, mass of which is presumed as a model 100% ideal mass. For products weighing less than the mass standard, obtained results are lower than 100%, for products weighing more, the obtained results are greatly excessed.
- GLP Procedures: Diagnostic function allowing to objectively document performed measurements. GLP procedures may be either presented in a short report form or extended one.
- Formulation: Function supporting the mixture making process, wherein the mixture contains various components. Formulation function usually uses the balance/scale database of components. Formulation serves for monitored checkweighing of every single component with a given tolerance. It is enriched with a set of individual settings.
- IR Sensors: Programmable function supporting the weighing process through control of the following options: sliding weighing chamber doors, printout, zeroing, tarring etc. Especially appreciated wherever preventing the balance from soiling is important.
- Statistics: Statistics function registers and analyses performed measurements. This supplies the user with the following information: Max and Min standard deviation, average value, variance, range et.
- Totalizing: Function adding new mass value to already obtained one. This allows to determine mass content of the mixture, being a composition of number of different consistence components. Totalizing is limited by maximum capacity parameter.
- Animal Weighing: Process of mass determination for a product which may unwillingly reposition within the weighing pan. Mass determination in such cases requires much longer period of time when compared to typical weighing process. It is the user who defines period of time needed for control of measured product mass. The user can thus optimize the function depending on the measured product characteristics.
- Density Determination: Liquid or solid body density function uses the Archimedes principle and it requires a special kit to be applied. The kit when used, replaces a weighing pan. For solids mass of the sample must be determined first in the air, next in the liquid of specified density. For liquids the so called sinker, density of which has been determined, must be measured first in the air, next in the tested liquid. The density determination process is disturbed by air bubbles which may stick either to the measured sample or the sinker. In case of laboratory equipment very light solids may be measured. For industry, solid bodies density may be determined by means of under-pan weighing. Tested load of significant size may be measured this way.
- Peak Hold: Function registering the greatest temporary indication occurring in course of the weighing process. It is most often used in medical scales in order to hold the measurement indication.
Technical Specifications
- Max capacity [Max]: 82/220 g
- Minimum Load: 1 mg
- Readability [d]: 0.01/0.1 mg
- Tare Range: -220 g
- Repeatability: 0.015 mg
- Linearity: ±0.06 mg
- Stabilization time: 6/3.5 s
- Sensitivity drift 1 ppm/°C in temperature: +10 ° – +40 °C
- Working temperature: +10 ° – +40 °C
- Power supply: 12 ч 16 V DC
- Adjustment/Calibration internal (automatic)
- Display: 5
- Interface: 2ЧRS 232, USB-A, USB-B, Ethernet, Wireless Connection (option)
- Net weight/Gross weight: 5.4/7.5 kg
- Pan Size: ш 85 mm
- Packaging size: 495Ч400Ч515 mm
- Power supply: 250 mA
Warranty Information:
- 2-Year Warranty


